The last time I made a post I showed you our schedules. Today I thought I would show you how I help my kids complete the tasks as independently as possible. We use number matching 4 of 6 students. There are numbers that correspond to the number of activities to be completed at each station. The kids match the number to the number on the shelf or drawer. We consistently use TEACCH methods to set up tasks and work systems. This means that we work from Left to Right and Up to Down.
The following are examples of what their independent work stations look like. These have been decided based on the furniture I have and which students would work best at each spot. The large connected desks are great. Plenty of space and the shelf helps fit more work tasks. There is a finished basket by each independent station for students to put each task in as they finish. We mostly incorporate folder tasks and paperwork at independent work. However, we sometimes put puzzles or other similar tasks as well.
I needed a 5th independent work spot this year and I was really trying to avoid taking up more valuable space so I bought a folder storage pocket chart and hung it next to my most flexible student's desk. It works great!
One of my students uses a color matching system instead. He is most successful with matching colors so it works better for him. He still needs prompts to use it correctly, he often wants to match all of them to their partner before completing any of the work:) His work tasks are mostly tasks that we have made to fit his needs and academic abilities.
Here is our choice area. This was not set up last year. There was more structure needed for my new students so I made pull-offs (Velcro pictures that can be pulled off) for each choice activity the students can pick from. They are able to match the pull-off to the desired task. Once they clean up one task they can make another choice.
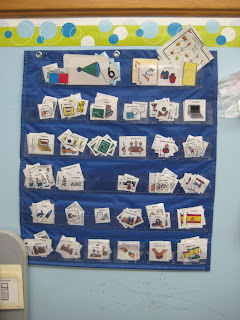
I also took a picture of how we organize the pictures visuals we need each day. They are alphabetized so they can be found quickly. I believe this was an old calendar pocket chart and it works perfectly!


Thanks for the visuals on how you set up your stations! I like your number and color matching systems. Do you have students who cannot do any independent work? How do you handle that? I have several students who always need more than just supervision or verbal prompting with tasks, either because of severe physical impairments or severe cognitive impairments, so it's difficult to get everyone working even semi-independently at once in stations like this.
ReplyDeleteKara
Spedventures
Kara,
DeleteI have a student who is unable to do any work independently. Everything that he does is hand over hand with myself or an aide. Coming up with activities to do with him and ways to modify the curriculum can be difficult. He does not go through stations in the way my other students do. We take turns working with him while the students are working on station activities.
Thanks for reading!
Amy
Thanks for sharing how you organize all your cards. I think I may try something similar as I am getting more and more pictures! Thanks for sharing how you organize your centers too!
ReplyDeleteKate
http://funinecse.blogspot.com/
Hey there! My name is Kim and I am also a special educator and though I do not work directly in an autism until I have had a student with autism on my caseload every year since I have been teaching (8 years)! I enjoy looking at how others set up their stations and I love your organization. Simple and looks great!
ReplyDeleteI love learning new ideas for students with autism. I am a new follower! Come on over and check out my blog for ideas on working with students with all kinds of abilities!
Kim
Mrs. H's Resource Room